Step 1: Log in to Appmint:
Begin by logging into your Appmint account. You will be directed to the main dashboard.

Step 2: Access the Database Section
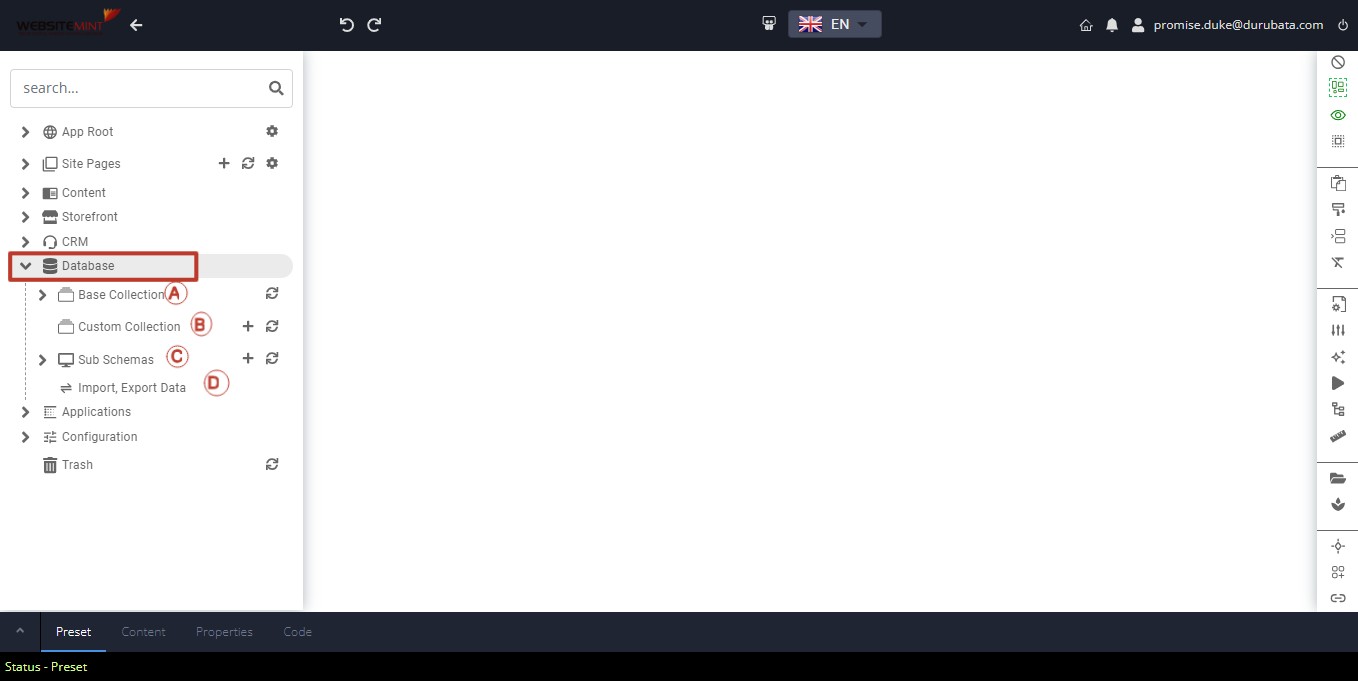
- Click on the Database dropdown in the main menu. You will see the following options:

- A. Base Collections: Pre-built data that comes with the application.
- B. Custom Collections: Data structures you create yourself.
- C. Sub Schemas: Useful for nesting a specific data structure within another parent data structure.
- D. Importing and Exporting Data: Facilitates data migration in and out of Appmint.
B. Custom Collections
These are the data structures you create from scratch.
Creating a Custom Collection:
- Access Custom Collections:
- Click on Custom Collections to view the data structure.

- Click on the plus icon (+) in front of Custom Collections to create a new collection (Image). A new page opens displaying the title bar with the following tabs: Edit Tab, Rule Tab, Tree Tab, Table Tab, Preview Tab, Settings (Gear Icon), and Save Icon.

Building Your Collection:
- In the Edit Tab, follow these steps:
i. Navigate to the Elements Menu which has the Elements, Collection, and Layouts dropdown lists.

ii. In the **Elements** dropdown, you can add items such as paragraphs, buttons, containers, text fields, and more.
iii. Optionally, use the **Collections** dropdown for ready-made elements like activity, address, audience, call logs, etc.
iv. In the **Layouts** dropdown, you can add tabs, accordions, and sliders, then include other elements within them.
After adding your preferred elements:
v. Click on the gear icon to name your collection and give it a title,Enable Workflow, Enable Versioning, Enable Indexing, Enable SubSchema and set Default Roles.
 .
vi. Click the save icon to save your custom collection.
 vii. Use the Preview Tab to see the output.

Setting Up Properties for Your Custom Collection:
Click on the dragged element.

Click on the Property Tab in the Edit menu.

- Properties vary by element (e.g., name, title, format).
- You can set properties like unique, required, repeatable, disabled, readOnly, collapsible, etc.
- Add validations from the validation dropdown (e.g., equal, greater than, isEmpty, maxLength, isEmail) and set a pattern (RegEx) for your element
- Add a Watched Path Property using the Watched Path Dropdown.
Save and preview your settings.

Adding a Theme to Your Custom Collection:
- Click on the dragged element.

- Click on the Theme Tab in the Edit menu.

- Notice the following dropdowns: Preset, General, Controls, Slider, Accordion, Tab.
Conclusion: Appmint’s Custom Collections feature provides a flexible way to create personalized data structures by adding elements, defining properties, and applying themes. With built-in tools for validation and layout customization, users can build robust, dynamic collections suited to their specific needs.


